How to Perfectly Light Your Bedroom with LED Strips
DeckTok
LED strip lights can transform your bedroom from ordinary to extraordinary – and they're easier to install than you think. Whether you want a cozy reading nook or a vibrant gaming setup, this guide shows you exactly how to do it.
What you'll learn:
- Creative ways to use LED bed lights around your bed, desk, and ceiling
- How to choose the right LED strips without getting confused by specs
- Step-by-step installation that guarantees professional results
Let's get started.
Spark Your Inspiration: Bedroom LED Ideas
Before we dive into the details, let me show you what's actually possible with LED strips. These aren't just decorative lights – they're versatile tools that can completely transform how your bedroom looks and feels.
Let me share some tried-and-tested setups that consistently deliver stunning results.
The "Floating Bed" Effect
This technique never fails to impress. By mounting LED strips underneath your bed frame, you create a subtle ground-level glow that makes your bed appear to hover above the floor. It's not just visually striking – it's incredibly practical too.
Why it works: The soft underglow serves double duty as ambient lighting and a gentle nightlight. No more stumbling around in the dark or harsh overhead lights disrupting your sleep cycle.
Best for: Modern and minimalist bedroom designs where clean lines and subtle sophistication are key.

Hotel-Style Headboard Backlighting
Want to know the secret behind those luxurious hotel bedrooms? It's all in the backlighting. Installing LED bed lights behind your headboard creates a stunning halo effect that instantly elevates your space from basic to boutique.
Why it works: This indirect lighting creates the perfect environment for evening reading while adding visual depth to your wall. It's amazing how this simple addition can make your bedroom feel like a five-star suite.
Best for: Anyone looking to create a warm, inviting atmosphere that screams sophistication without the designer price tag.
Architectural & Ceiling Accents
Here's where LEDs in rooms really shine – literally. By installing strips in ceiling coves or along the room's perimeter, you create beautiful, shadow-free illumination that makes your entire space feel larger and more inviting.
Why it works: This technique mimics natural daylight patterns, providing even distribution of light that eliminates harsh shadows and dark corners. Small rooms suddenly feel spacious, and large rooms become even more impressive.
Best for: Rooms with interesting architectural features, or any space where you want to maximize the perception of size and openness.

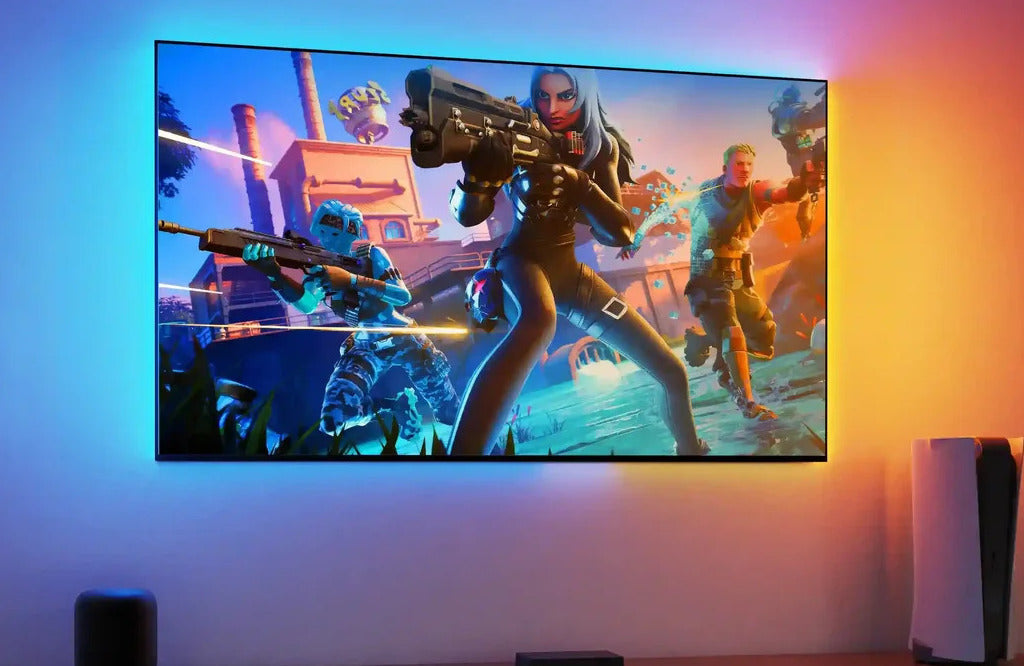
Desk & Entertainment Zone Lighting
Transform your workspace or entertainment area from functional to phenomenal. Installing strips behind your monitor reduces eye strain during those late-night work sessions, while TV backlighting creates an immersive viewing experience that rivals any home theater.
Why it works: The bias lighting improves screen contrast and reduces eye fatigue by providing a consistent light reference point. Plus, it just looks incredibly cool when your entire setup glows in harmony with your content.
Best for: Remote workers, gamers, and movie enthusiasts seeking a balance of style and functionality in their setup.

How to Plan Your Bedroom LED Light Layout
Here's something most guides won't tell you – the difference between a professional-looking installation and an amateur one isn't in the products you buy, it's in the planning you do beforehand. Just 10 minutes of preparation can save you hours of frustration and ensure your LED bed lights look exactly how you envisioned.
Let me walk you through my planning process.
Define Your Lighting Goal
Before you even look at products, answer this fundamental question: What's the primary purpose of these lights? Your answer determines everything else.
For Relaxation and Ambiance: If you're after that perfect wind-down atmosphere, focus on indirect lighting placements. Think under-bed glows and behind-headboard halos that create a mood without overwhelming the senses.
For Practical Tasks: Need bright, focused illumination for reading or working? Position your strips where they'll provide direct, functional light – under shelves, above your desk, or along the sides of your mirror.
For Entertainment and Impact: Want that Instagram-worthy setup? Focus on dynamic areas around screens and explore color-changing options that sync with your content or music.
Understanding your primary goal helps you avoid the common mistake of trying to make one lighting setup do everything.
Understanding Basic Light Layers
Professional interior designers think about lighting in layers, and LED strips can fulfill any of these roles:
Ambient Light: Your room's foundational glow – the general illumination that fills the space. Ceiling-mounted strips excel at this.
Task Light: Focused illumination for specific activities. That strip under your desk shelf? Pure task lighting gold.
Accent Light: The showstopper that draws the eye. Your backlit headboard or glowing TV frame creates visual interest and focal points.
Most bedrooms benefit from at least two of these layers. LEDs in rooms work best when you understand which role they're playing in your overall lighting design.
Sketching Your Layout & Power Sources
Time for the most crucial step that everyone skips (and then regrets). Grab any piece of paper – this doesn't need to be artistic.
- Sketch your room layout, including major furniture pieces like your bed, desk, and dresser
- Draw bold lines showing exactly where each LED strip will go
- Measure and note the length needed for each section (a rough estimate is fine)
- Mark your power outlets – This is critical! Know where your electricity comes from to avoid ugly extension cords.
Pro tip: Take a photo of your sketch. You'll reference it constantly while shopping and installing.
This simple blueprint transforms vague ideas into an actionable plan. You'll know exactly how many feet of lighting to buy and where every component needs to go.
How to Choose the Right LED Strips
Walking into the LED marketplace can feel like entering a foreign country where everyone speaks in lumens, Kelvin, and voltage. Let me translate the technical jargon into plain English and show you what actually matters for bedroom lighting.
Choosing Your Light Color: White, RGB, or RGBIC?
Your first and most important decision: what type of color capability do you need?
Single Color / White Strips: The sophisticated choice for those who value elegance over effects. Perfect when you want consistent, reliable illumination.
- Insider tip: Look for "tunable white" or "CCT adjustable" options. These let you shift between warm, cozy tones for evening and cool, energizing light for morning – best of both worlds without the rainbow colors.
RGB (Standard Color-Changing): The versatile middle ground. Set your entire strip to any color you want – perfect for basic mood lighting without breaking the bank.
RGBIC (The Premium Choice): This is where LED bed lights get exciting. The "IC" means individual control – different sections can display different colors simultaneously.
- What makes it special: Think flowing rainbows, chasing effects, and lights that pulse to your music. If you've seen those viral bedroom setups on social media, they're using RGBIC.
Key Specs Explained: Brightness, Density, and Voltage
Let's cut through the technical overwhelm. Here are the only specifications that truly impact your bedroom experience:
LED Density (LEDs per meter):
- 30 LEDs/m: You'll see individual light dots – only acceptable if completely hidden
- 60+ LEDs/m: Creates that smooth, professional light bar effect everyone wants
For LEDs in rooms where any part might be visible, always go with higher density. The price difference is minimal, but the quality difference is dramatic.
Brightness (Measured in Lumens):
- Accent lighting (behind TV/headboard): 300-500 lumens/meter provides a perfect glow
- Task lighting (desk areas): 800+ lumens/meter ensures you can actually see what you're doing
Most quality products will indicate whether they're designed for accent or task lighting.
Voltage Considerations:
- 12V systems: Perfect for single furniture pieces or smaller areas
- 24V systems: Essential for room perimeter installations or runs over 15 feet
The voltage affects how evenly your lights shine from start to finish – higher voltage means more consistent brightness.
How to Control Your Lights: Remote, App, or Voice
How you control your lights matters as much as the lights themselves:
IR Remote (Basic): Works, but feels dated. You need line-of-sight to the sensor, which often gets blocked.
Bluetooth App (Better): Control from your phone with more options, though you need to be in the same room.
Wi-Fi with Voice Control (Best): The game-changer for bedroom convenience. Imagine saying, "Hey Google, bedtime," and having your LED bed lights automatically dim to a soft amber glow. Set schedules, control from anywhere, and integrate with your smart home ecosystem.
Smart lighting brands like Decktok, for example, have user-friendly apps that integrate seamlessly with Amazon Alexa and Google Assistant, making voice control simple and reliable.
For a truly modern bedroom, Wi-Fi-enabled strips are worth the small premium. Most quality kits include everything needed: strips, controller, and power adapter.
How to Install Your LED Strip Lights
The moment of truth has arrived. Your LED strips are unboxed, your plan is ready, and it's time to transform your bedroom. Follow this proven process, and you'll achieve professional results without professional help.
Step 1: Gather Your Tools
No need for a contractor's arsenal. Here's everything you actually need:
- Your complete LED kit (strip, controller, power adapter)
- Clean microfiber cloth
- Isopropyl alcohol (70% or higher)
- Measuring tape
- Sharp scissors
- Optional but helpful: cable clips for wire management
Step 2: Test Your Lights Before Installing
I cannot stress this enough – this single step will save you from the nightmare of troubleshooting after everything's installed.
- Carefully unroll your entire LED strip on a clean surface
- Connect all components: strip → controller → power adapter
- Plug in and power on
- Test every function: cycle through colors, try different effects, check brightness levels
If anything seems off now, it's a quick exchange. Once that adhesive touches your wall, you're committed.
Step 3: Clean the Surface for Proper Adhesion
Want to know why some people's LED strips fall off after a week, while others last for years? It all comes down to surface preparation.
- Clean thoroughly: Dampen your cloth with isopropyl alcohol and wipe down every inch where strips will attach
- Remove all residue: Pay special attention to dusty areas and spots that might have oil from hands
- Let it dry: Give it 2-3 minutes – the alcohol evaporates quickly
This simple step makes the difference between a temporary decoration and a permanent upgrade.
Step 4: Measure, Cut, and Apply the Strip
With your surface pristine, it's installation time:
Final measurement: Hold your strip against the installation area one last time. Better to double-check than to come up short.
Cutting (when necessary): Look for the marked cut lines – they're clearly indicated with scissor icons and visible copper pads. ONLY cut here. Cutting elsewhere destroys the circuit and ruins that section permanently.
The peel-and-stick technique:
- Start at one end, peeling back just 6 inches of backing
- Press firmly for 10 seconds to ensure strong initial adhesion
- Continue in small sections, maintaining tension to keep the strip straight
This methodical approach prevents bubbles, ensures straight lines, and gives you control to make adjustments as you go.
How to Handle Corners
Corners are where amateur installations reveal themselves. Here are two professional approaches:
Option 1: The Gentle Curve (Easier for beginners) Create a smooth, rounded corner by gently bending the strip. Never crease or fold sharply – the internal circuits are delicate and will break under stress.
Option 2: Cut and Connect (For perfect 90° angles) Use L-shaped connectors for crisp, professional corners:
- Cut the strip at the designated line before the corner
- Attach the connector to the copper pads
- Connect a new strip section on the other side
This method takes slightly more time but delivers showroom-quality results.
Creative Ways to Use Your Smart LED Lights
Your basic installation is complete, but we're just getting started. If you invested in smart RGBIC strips, you're sitting on a goldmine of possibilities. Let me show you how to unlock features that will make your friends think you hired a professional designer.
Sync Your Lights with Music
Transform your bedroom into a personal concert venue where lights dance to your soundtrack.
How to activate it: Open your LED app, find "Music Mode" or "Rhythm Mode," and grant microphone access. Your lights will instantly respond to ambient sound, pulsing and changing colors with the beat.
Pro settings: Most apps let you adjust sensitivity and color schemes. For chill sessions, use slower transitions with warm colors. For parties, crank up the sensitivity with full-spectrum colors.
Best uses: Morning workouts, study sessions with lo-fi beats, or setting the perfect vibe for social gatherings.
Set Up a Gentle Sunrise Alarm
Why jolt awake to a harsh alarm when your LED bed lights can ease you into the day naturally?
Setting it up:
- Navigate to "Schedules" or "Automation" in your app
- Create a "Wake-up" routine for your desired time
- Enable "Fade-in" or "Gradual" mode (20-30 minutes works best)
- Program colors to transition from deep red → orange → warm white
The science: This mimics a natural sunrise, triggering your body's wake response gently. You'll feel more refreshed and less groggy – it's like bringing sunrise into your bedroom regardless of the season.
Create Custom Scenes and Voice Commands
This is where LEDs in rooms become truly intelligent. Create preset "scenes" that transform your space instantly with a voice command or single tap.
Must-have scenes for your bedroom:
- "Movie Night": Dims to 20% purple behind the TV, creating perfect bias lighting
- "Focus Time": Bright, cool white at 100% over your desk area only
- "Wind Down": Slow fade between warm oranges and reds at 40% brightness
- "Reading Mode": Moderate warm white behind the headboard at 60%
Voice control magic: Link with Alexa or Google Home to create routines. "Hey Google, good morning" can turn on your sunrise simulation, while "Alexa, goodnight" dims everything to a soft nightlight mode.
The real power comes from combining multiple smart devices. Imagine saying "Movie time" and having your LED strips dim, your smart TV turn on, and your smart blinds close automatically.
FAQs
Why won't my LED strip stick to the wall?
This is frustratingly common but easily fixed.
The usual culprits:
- Surface contamination: Even invisible oils from your hands can prevent adhesion
- Textured surfaces: The adhesive needs smooth contact – textured paint or raw wood won't work
The solution: Don't try to revive the compromised adhesive. Instead, use clear mounting clips (available at any hardware store) or high-quality double-sided mounting tape. These provide a permanent solution that's actually more reliable than the original adhesive.
Part of my strip is a different color or won't light up.
Before panicking about defective products, check these connection points:
The fix:
- Unplug everything first (safety first!)
- Check the 4-pin connector between the strip and the controller – it often comes loose during installation
- Ensure the small alignment arrows match up perfectly
- For cut sections, verify that the connector clamps are biting into the copper pads properly
In 90% of cases, reseating these connections solves the problem.
My remote isn't working.
For IR remotes:
- Remove the clear plastic battery tab (easy to miss!)
- Ensure direct line-of-sight to the receiver
- Check if the receiver's IR sensor is blocked by furniture
For app control:
- Verify Bluetooth/Wi-Fi is enabled on your phone
- Try removing and re-pairing the device in the app
- Some apps require location services enabled (for Bluetooth discovery)
Are LED strips safe to leave on all night?
Absolutely! Quality LED strips are designed for continuous operation. They run on low voltage (12-24V), produce minimal heat, and use less energy than your phone charger. They're perfect as nightlights and far safer than traditional bulbs.
Energy cost: Running a 16-foot strip all night costs less than $0.02 in most areas – a small price for better sleep and safer nighttime navigation.